-
A
new request can be generated by an user by clicking on the NEW tag provided in the
Create Request page.
-
A
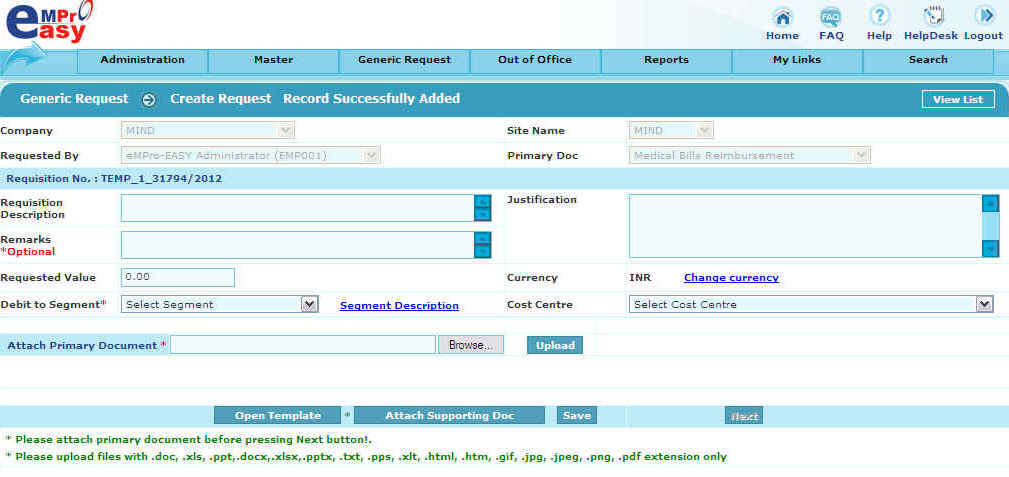
Create/Edit requisition page gets displayed from where creation of a request is
started. The following fields have to be filled by a user which are Company Name, Site
Name, Requesting User name and Primary Document to be attached with the request.
-
A
primary document will be displayed only if one of the following conditions is met i.e.
(a)
An user must have access to a document.
(b)
A Site must have access to a document.
(c)
If Primary doc require is 'yes' then on the time of creation of
request, user must attach Primary document and if any
document which is not a Primary document then it is optional and
'Next' button will be enabled.
(d)
Workflow has to be defined relative to a Site and primary document, or
the Department head of a requesting
person
should exist, or
Admin Boss must exist in case of Admin type of documents, or
Technical Boss must exist in case of Technical type of documents.
-
On
submitting the create/edit requisition page after filling the required fields,
a random Requisition number for a request is generated.
-
The
user now has to provide information such as Requisition Description, Approval
Description, Remarks, Requested value, Currency name and Keyword.
-
Keyword
can be used to identify or search for a request, in future by a user.
-
The
user then has to save the page by the Save button provided in the page and then attach
the primary document. Attaching a primary document along with a request is
mandatory. Supporting document, if any, may or may not be attached
as per the user choice.
-
Now
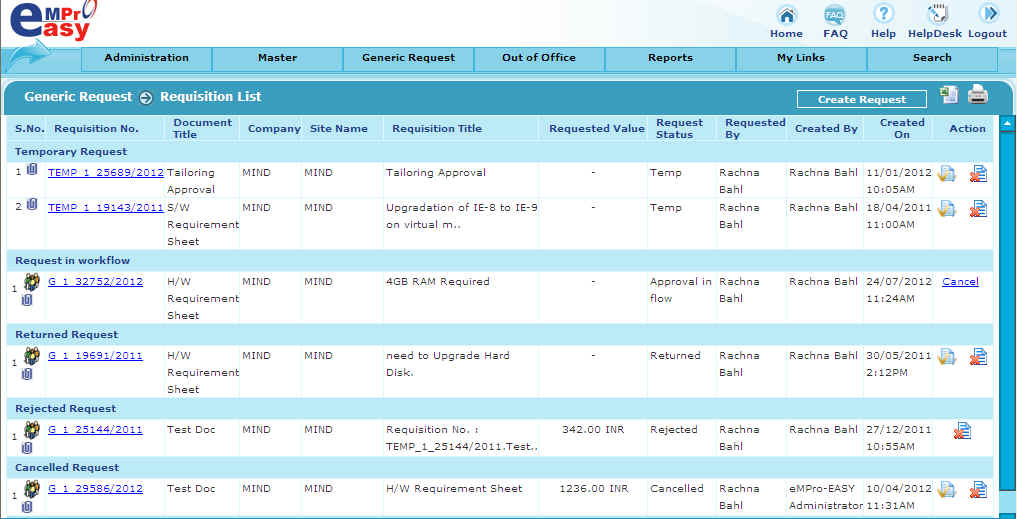
if the user performs the Save operation the Requisition list opens up and the
request created will appear in the Temporary Request section and is not submitted
in the Workflow for approval. The user can further Update the request to submit any of
the request in the Temporary section to the Workflow for approval.
-
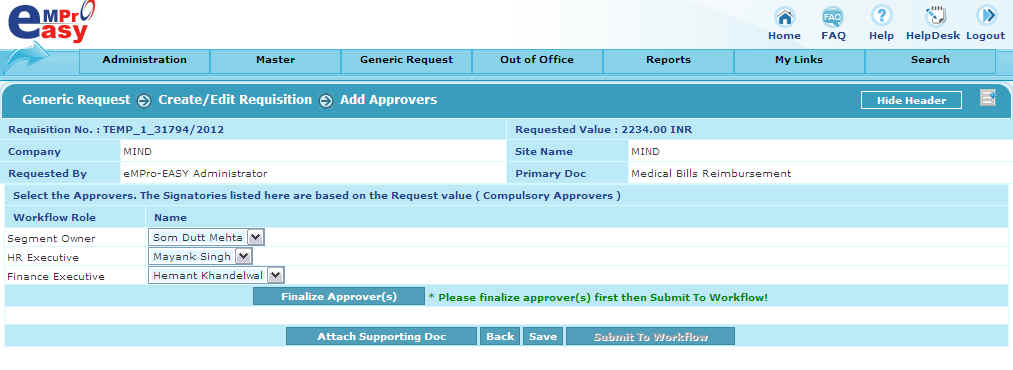
For
the Fixed Approver case when a user clicks the Next button on the Create/Edit
Requisition page, a new page Add Approvers is displayed. The
Approvers name is based on the Value involved and respective Document Workflow defined
by an Administrator or Sub Administrator. The user has to add the
Approvers who will be responsible to approve his/her request through the Add
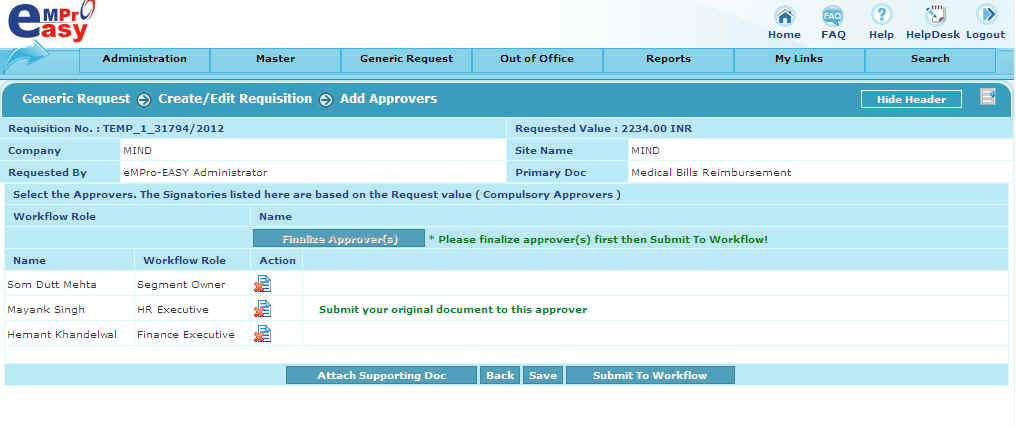
Approver button. The final list of approver names and their
specific Workflow role is displayed to the user and if any approver is wrongly
chosen the user can delete the approver from the list of approvers
and resubmit appropriate approver to the workflow.
-
In
case of Flexi Approver only Workflow for a Site Document is defined by an Administrator
or Sub Administrator.
The
user can choose any Approvers available in the the Name combo corresponding to the
defined Workflow and thus define his/her choice of approvers
through which this request will flow.
-
Now
till the request is not submitted to the workflow the request will appear in the
temporary request. On submitting the request to the workflow a final page is
displayed showing the Request Number, and the Requisition Request now can be seen in the
Request in workflow section, until it finally gets approved.
-
The
user can easily view his/her request status and the approver with which the request is
pending by clicking on any of the request in the Requisition list.
However other sections such as the Returned and Rejected request depend in terms of the
action taken by any of the approvers defined in the Workflow,
while the Cancelled requests are due to cancellation of request by the Originator.
-
When
a request is returned by the approver, a mail is generated to the request originator and
the request will appear in the originator Requisition list Returned request
section. The originator can resubmit the request to the Workflow after updating the
request.
-
The
Rejected section contains the list of permanently rejected requests. A mail is sent to
the originator of the request and for the rejected requests the originator is
not allowed to update or resubmit the request to the workflow again.
-
The
Cancelled Request section contains the Requisition request that were cancelled by the
Originator while the request was still in the approval or Workflow cycle. Any
request cancelled from the Request in Workflow section moves to the
Cancelled request section.
-
The
Requisition detail of any request in the Create Request page can be known by using the
Request No hyperlink.
-
The
Requisition detail list displays complete information about a request. The Requisition
Detail displays the Approver list, Approver information, Applicability comments and the
Attachments with the request.
-
The
Mail Flow of a respective request is used to know the flow of mails starting from the
Request Originator to the Last Approver.


